Want to make your WordPress site look better but worry about the bulk and slowdown caused by block-extenders, themes, and plugins? Fortunately, ChatGPT takes the technical knowledge needed to do this and can even help you eliminate slow page builders or expansive block libraries.
Here’s the problem that most sites without WordPress development experience will run into… ChatGPT can do the work, but if you don’t know how to tell it what work to perform, it is essentially useless for this.
Luckily, it’s pretty straightforward and below is a no frills tutorial on how you could do this.
Editor note: It’s always recommended to back-up your site or work from a staging copy of the site when trying something new.
Add custom style without any extra bulk in WordPress
When your website loads for visitors, the end result is html; however, most WordPress site have files that include CSS, HTML, Javascript, and pHp.
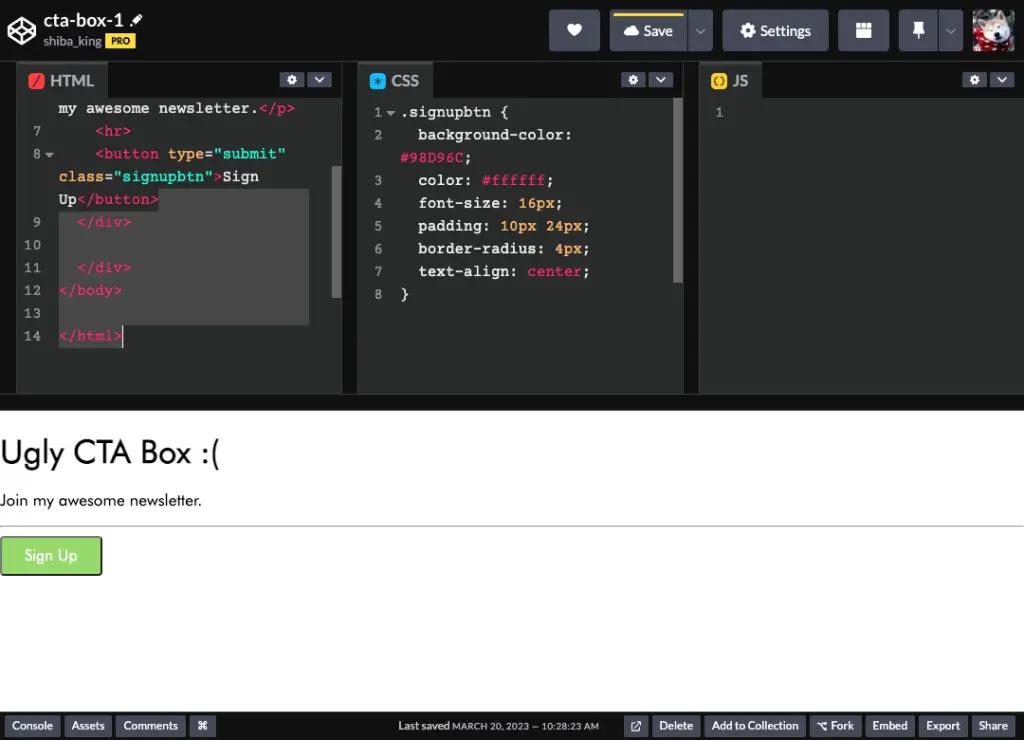
CSS is the language responsible for how a website looks to the visitor. So if you wanted to have a nice looking newsletter signup box on your page, but didn’t have any CSS defining how this style of section or container was supposed to look on your site it might look like this.

Not great IMO.
The html below is from the example. It would load incredibly fast because it is pure html; unfortunately it’s not the most beautiful CTA box.
<body>


  <div class="container">
    <h1>Ugly CTA Box :(</h1>
    <p>Join my awesome newsletter.</p>
    <hr>

      <button type="submit" class="signupbtn">Sign Up</button>
    </div>
  </div>


</body>
Now, that CTA box could be styled thousands of cool ways but if my entire sites uses unique CSS for every single element or component — which is exactly what plugins and themes do — the site gets bloated pretty quick.
I want to do a letter better shopkeeping, so instead of having each plugin, theme, or add-on reinventing the wheel, I can customize elements to my preferences and use about 80% less excess CSS or JS. But what if you have no clue how to do this?
Make ChatGPT your personal front-end developer
Here’s just one way to approach this. I won’t go into much more detail but will add further examples and details in blogs in the future.
Instead of explaining what I want the box to look like, I can better communicate to ChatGPT by finding examples from CSS libraries that ChatGPT already knows, so this way I can pick what I like and know it can make it exactly as I imagine.
Note: Here’s a list of popular CSS libraries. Just look at the styles of the elements and pick one you like. Don’t worry, having ChatGPT change the fonts or colors is easy.
Login to ChatGPT, and ask it this question.
Add some custom css to make this look similar to the default styles in Bootstrap


<body>
  <div class="container">
    <h1>Ugly CTA Box :(</h1>
    <p>Join my awesome newsletter.</p>
    <hr>
  <button type="submit" class="signupbtn">Sign Up</button>
</div>

  </div>
Here’s what it gave me back.
.signupbtn {
  background-color: #69A5D2;
  color: #ffffff;
  font-size: 16px;
  padding: 10px 24px;
  border-radius: 4px;
}
But, maybe I want a green button and the text centered. So, all I have to do is ask…
center the text and change the button color to light-green
ChatGPT delivers.
///Hooray, ChatGPT delivers///

.signupbtn {
  background-color: #98D96C;
  color: #ffffff;
  font-size: 16px;
  padding: 10px 24px;
  border-radius: 4px;
  text-align: center;
}
Now, I have the box I wanted.

Adding your custom styles to the site
To ensure my site stays fast, I want to add this style to my theme. To do this properly, I want to create a child theme which is very easy to do without a plugin. Try this free generator.
- Go into your site files or into WordPress admin
- Go to your styles.css file (in Theme File Editor under Appearance in wp-admin)
- Copy the CSS ChatGPT last gave you
- Then, add it to your child theme inside your styles.css file by pasting it at the top
Done. Almost.
Using your ChatGPT-generated WordPress styles on the site
To add the new style or component to your site, you could use the WordPress html — or code view — inside of the post editor to place it where you want.
In the post editor, click the settings, code view, then paste JUST the html, not the CSS from ChatGPT, into the area you want the component.
Since I made the html in our example, you can get a list of of html components here for ChatGPT to style for you.

If you use WP v6.0+ you can actually make this a lot easier by simply adding this as a “theme part” inside of the Site Editor, using the same process as above, but by adding it as a single theme part or custom block, it’ll then be available as an item inside of the Gutenberg or post editor.
You can then use the parts to assemble more elaborate designs or whole page templates, all without code, design according to your preferences, and without a plugin or bloated theme.


