Our recent Customer Week was incredible. We were able to introduce a variety of new expansions and features of Ezoic to our new and existing customers.
The new Ad Tester update to the WordPress plugin is an area that could benefit from more in-depth information.
In case you missed any of the announcements, as a quick recap, we released an Ad Tester update to the Ezoic WordPress Plugin. The purpose of the plugin is to ease the process of getting started with monetization with Ezoic. By putting more control in the hands of publishers and letting them take advantage of Ezoic’s ad placement experience, it’s easier than ever to start improving your site and increasing your EPMV.
For ease of use, you’re able to also relocate the placeholders as needed via a variety of options.
This is all accessed through the Ezoic WordPress plugin and has all the info to lead anyone through the process of conveniently adding placeholders to their site.
Before we get started it’s important to know that using the WordPress plugin to insert placeholders does not mean you have to delete other placeholders and in fact, you shouldn’t. Deleting existing placeholders could result in your EPMV plummeting.
Getting started
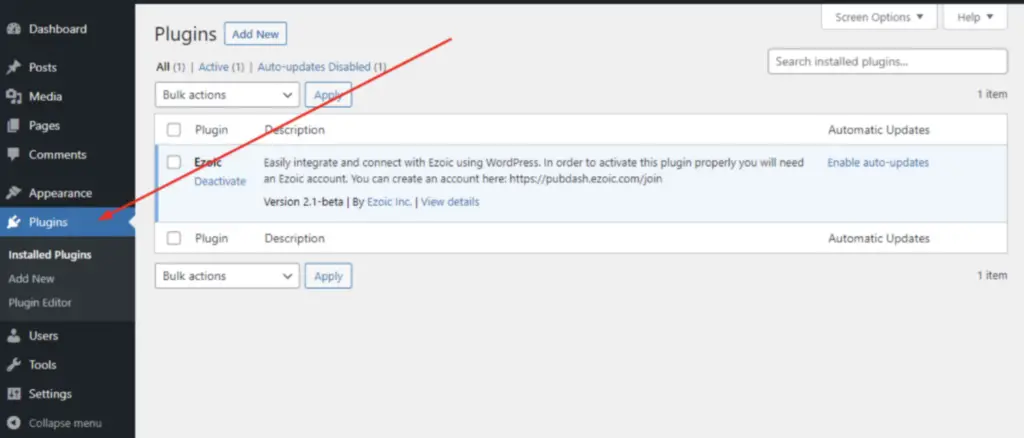
You’ll first want to make sure you have the Ezoic plugin installed. This capability is available for those publishers who are cloud-integrated or those who use WordPress CMS.
Those looking for the best experience should cloud-integrate to make full use of the plugins feature set, but can also use the Ad Settings features while WordPress integrated.

If the plugin is already installed (as in the above image), you’ll need to update it before you see the new features.
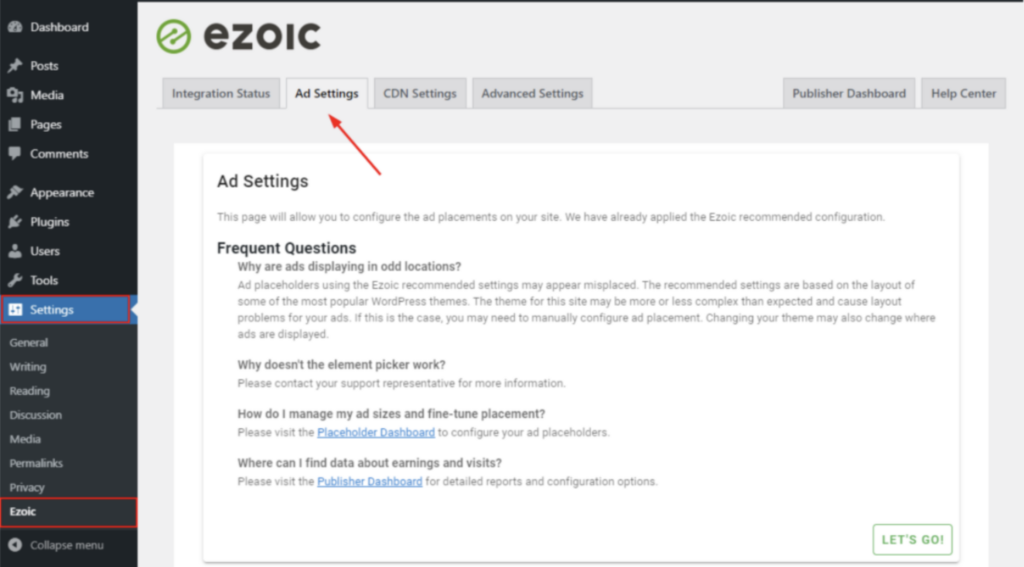
Once activated/updated, navigate to “Settings”, then “Ezoic”, select the “Ad Settings” tab:

Then, select “Let’s Go”.
Creating placeholders
Upon activating the plugin, if they have not already been created, new placeholders are generated. These new placeholders follow the naming convention “wp_” and can be found in the placeholder dashboard. This is found in the Automatic Ad Placeholder Creation
Once created, these placeholders are automatically generated and assigned positions recommended by Ezoic. These positions should work in the majority of cases, but it is possible that the ads may appear in odd locations. In this case, the placeholder positioning can be managed in the “Ad Settings” tab in the Ezoic plugin.
New placeholders vs. existing placeholders
Automatic Ad Placeholder Creation is also where you’ll want to be to answer the question of whether to create new or hang on to existing placeholders. Existing placeholders are not modified or disabled during this process.
When determining whether an existing placeholder or new placeholder should be used that might be in a similar location, it is recommended to use the existing placeholder. The existing placeholder will retain various historical data like its EPMV.
Placeholder creation can take a few minutes (between 3 and 20). During this process, a message will be displayed on the Ad Settings tab.
If the user already has placeholders that were created either within the publisher dashboard or by using the Chrome extension, the default WordPress placeholders will not be automatically created.
This is to avoid confusion and the accidental doubling-up of placeholders which may occur when both the new and old placeholders are generated on the page.
If the user would like to use the generated placeholders, they may click on the “Generate Default Placeholders” button that appears on the Ad Settings page:

Additional inserter settings to know
When viewing the “Ad Settings” page, clicking on the gear on the upper-right will take the user to the Advanced Settings for the plugin. This allows the user more fine-grained control over placement as well as the option to “start over” with their configuration.
Paragraph and excerpt tags
When the plugin is positioning placeholders relative to paragraphs and excerpts, it will attempt to locate elements based on HTML tags. By default, WordPress surrounds excerpts and paragraphs with tags.
Some themes, however, may use tags instead, or a combination of tags. These fields allow the user to specify which tags to use during placement rule execution.
Multiple tags can be specified by typing the tag, pressing ENTER and typing the next tag.
Placeholder embed mode
When placeholders are positioned using the HTML Element Picker, placeholders may be inserted in one of two ways: client-side and server-side.
Server-side insertions are the preferred mode of rendering placeholders as the placeholders are positioned on the server before the page is sent to the client. This mode, however, requires the “dom” PHP module to be installed.
Client-side rendering of placeholders involves sending placeholder information along with the page, then inserting the placeholders as the browser is displaying the page. This mode will generally work more often than server-side rendering, but may negatively affect Core Web Vitals.
Clearing default configuration
The “Clear Default Configuration” button will reset all tag placement options to “Disabled.” This will only affect default placement rules and will not modify and customizations made by the user.
Reset Configuration
The “Reset Configuration” button will erase all placement configuration and restore the Ezoic recommended configuration.
Takeaways
Whether you’re new to Ezoic or a long-time customer, the Ad Tester addition in WordPress should be in everyone’s toolset.
The main point to remember from today is that we have over 50 preconfigured placeholders. Regardless of the length of your posts or pages, we have you covered in ways to optimize your site for monetization.
To learn more and hear from our Lead Product Developer, Bobby Dimmick, his webinar from Customer Week is a fantastic resource. Our Weekly Walk-Thru Playlist also has Q&A videos about the Ezoic WordPress Plugin if you’re interested in studying more.
We hope this gave you a more insightful guide to the new Ad Tester update to the WordPress Plugin!


